The abbreviation dpi will come up when you send a paper that has figures to a scientific journal. Dpi means “dots per inch” and describes the resolution of an image. But what is the correct dpi to use for figures in a paper? And how do you find out how many dpi your figure even has?
The minimum resolution for figures in a paper is 300 dpi
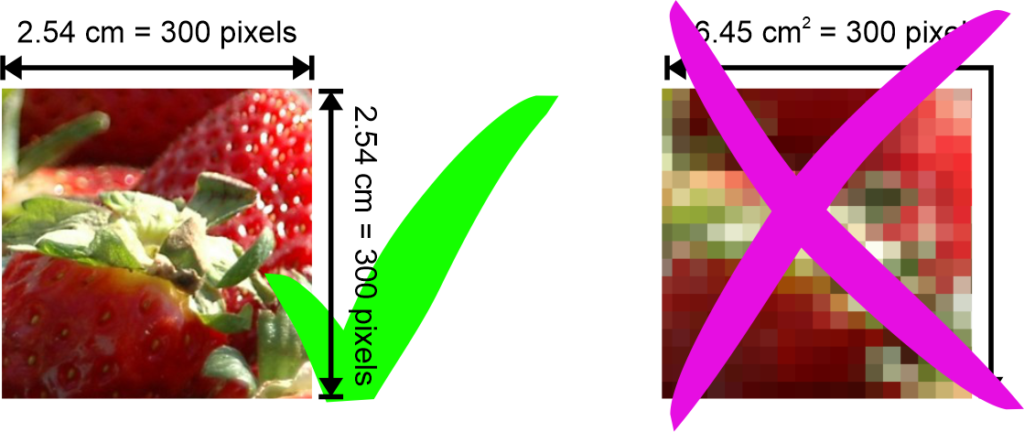
As mentioned before, the acronym dpi stands for dots per inch. An inch is 2.54 cm and “dots” simply means pixels. So, 300 pixels per roughly two and a half centimeters. This means 300 pixels in a straight line that is 2.54 cm long. Not 300 pixels in a square inch! A square inch contains 300 x 300 = 90,000 pixels.
Now, how do you achieve the correct number of dpi for figures in your paper? And how do you know how many dpi any given figure has?
Let’s start with the second question. How do you find out how many dpi your figure has? For that, you will need some type of image processing program. Because I love free open-source software, I’ll tell you how to do this with GIMP (click to get to GIMP.org and download the program).
- Open GIMP
- Go to File > Open or press CTRL + O
- Select the figure whose size and resolution you want to check
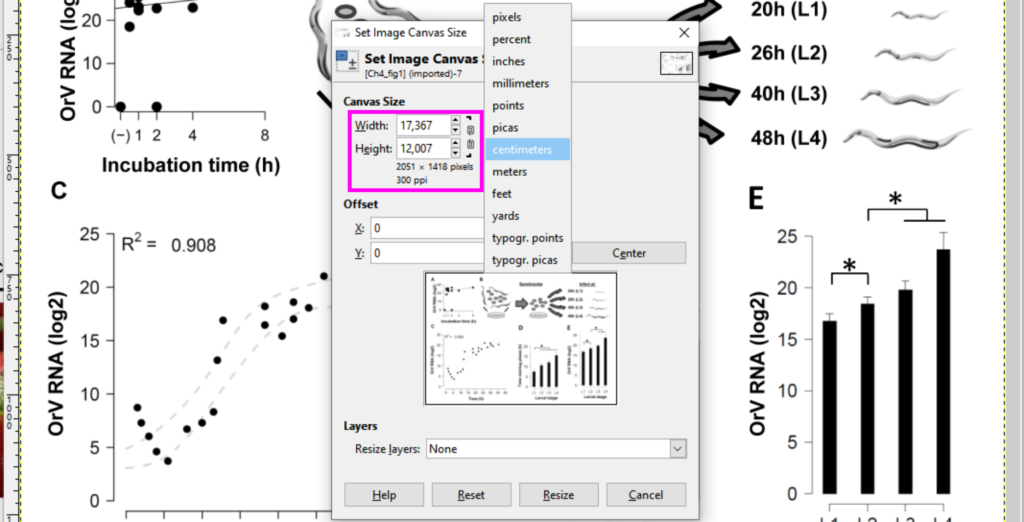
- With the figure open, go to Image > Canvas Size
In the uppermost area of the Canvas Size Window, underneath the “Width” and “Height” entries, GIMP will tell you the size and resolution of your figure. By the way, GIMP calls it “ppi”, pixels per inch. It’s the same as dpi, which is actually the more common abbreviation.
Now, GIMP will by default tell you the size of your figure in pixels. But if you click on the little drop-down menu next to the size and resolution, you can simply choose cm.
How big do your figures need to be?
Seems straightfoward enough, right? However, I would like to dwell on this a little to show you how the size in pixels can be deceiving. Why? Because it doesn’t tell you anything about the physical size of your figure. The physical size depends entirely on the resolution! Let’s imagine we have a figure that’s 300 dpi and has a width and height of 2051 x 1418 pixels. To figure out at which size this figure can be printed in the journal, you need to divide the pixels by the resolution. In this case, that means:
2051 pixels / 300 dpi = 6.837 inch
1418 pixels / 300 dpi = 4.727 inch
If you prefer centimeters, you will then need to multiply the values by 2.54, which brings us to a width x height of roughly 17.3 x 12 cm.
What if the resolution of a figure in your paper is lower than 300 dpi?
Imagine we have the same figure from our example above (2051 x 1418 pixels), but this time, it’s only 150 dpi. We don’t even need to go through the entire calculation again. since 150 is half of 300, the figure will be half the width and half the height. That means it’s only 8.65 cm wide.
Larger is usually fine unless your figure is gigantic – say, 50 cm wide and 600 dpi. While this makes for good quality, it may slow down the program that you use for putting together your paper.
Importantly, there is no way to make a small image larger while keeping the same resolution. You also won’t succeed in giving an image a higher resolution while conserving it’s size. Increasing resolution will always make the figure smaller. Increasing a figure’s size will decrease its resolution.
However, this is only the case with pixel-based images such as JPG and PNG. Vector-based images like SVG, CDR, EPS, AI, etc. can be resized almost indefinitely with a vector illustration program.
Exporting vector images at the correct dpi for figures in a paper
If you make your own figures, you need to use a vector illustration program (like the free Inkscape). In order for it to look good in your paper you need to export the figure at at least 300 dpi. Inkscape actually lets you enter your own dpi, so you can go crazy and export at 1200 dpi or something like that. This has the great advantage that you can increase the size of your figure to up to four times the original and still have the correct dpi for printing your figure in a paper.
To export from Inkscape, do this:
- Go to File > Export or press CTRL + SHIFT + E.
- In the Export window, select “Drawing” to make sure that you export everything.
- Under “Width” and “Height”, make sure that the figure is at least 15 cm wide. If it’s too small, select everything in your workspace and rescale it accordingly.
- Under “Image Size”, type in the number of dpi, at least 300. The image size in pixels will adjust itself.
- Under “Export As…”, choose the location in which your image should be saved.
- Click the “Export” button.
Unfortunately, Inkscape has one drawback: It only supports RGB. That’s why you can only export to PNG, not JPG (JPG requires CMYK). The colors in RGB images will look slightly different in print than they looked on your screen.
If you want to use a vector illustration program that does support CMYK, I recommend CorelDRAW. While Adobe Illustrator is the industry standard, you can only use it if you subscribe for a cloud service. You cannot own and install Illustrator on your computer anymore but instead are chained to a monthly subscription. That’s why I don’t recommend Illustrator.
To make your own figures, use Inkscape or CorelDRAW
Anyway, in CorelDRAW (which you’re probably able to buy cheaply through your university, i.e. via surfspot), you can export to JPG using the CMYK color space. However, CorelDRAW only supports up to 300 dpi. Therefore, you will need to make your figure at least as big as its printed version needs to be. If you want a higher resolution, simply make your figure twice as large as it’s supposed to be to achieve 600 dpi, three times as large for 900 dpi, etc.
To export from CorelDRAW, do this:
- Go to File > Export or press CTRL + E.
- In the Export window, choose the location in which your image should be saved.
- Also in the Export window, choose JPG in the File Type dropdown menu.
- Click the “Export” button.
- Under “Color Mode” choose CMYK.
- Scroll down to “Options” and, under “Width” and “Height”, make sure it says 100 %.
- Still in “Options”, under “Resolution”, select 300.
- Click “OK”
I hope I could show you the easy way around image size and resolution with this article!
Still sounds too complicated? Contact me for help with your scientific illustrations!